Create your next Short with Popcraft Canvas Agent.
Start a YouTube Short with one clear action you want the viewer to understand. Use Popcraft Canvas Agent to turn that idea into a brief and shot cards, review the script, then make the video from the assets that best explain it.
This walkthrough follows “One Idea, Three Shots,” a vertical tutorial for first-time creators. Canvas Agent produced a creative-brief text node and three shot-plan text nodes. We used real screenshots of that work to build the example composition.
🎬 What this example actually contains
Three still Canvas screenshots were cropped and prepared outside Canvas as silent, vertical 720 × 1280 MP4 clips lasting six, eight and six seconds. They show the Agent's summary, a single Shot 1 card and the Shot 3 review card. The clips were imported into Canvas and connected to a Video Composition node; its editor shows three clips on a 00:20 timeline. The optional narration below is part of the plan; this example's composition is silent. The downloaded Canvas render was verified at 20.00 seconds, 720 × 1280, 30 fps, with no audio track.
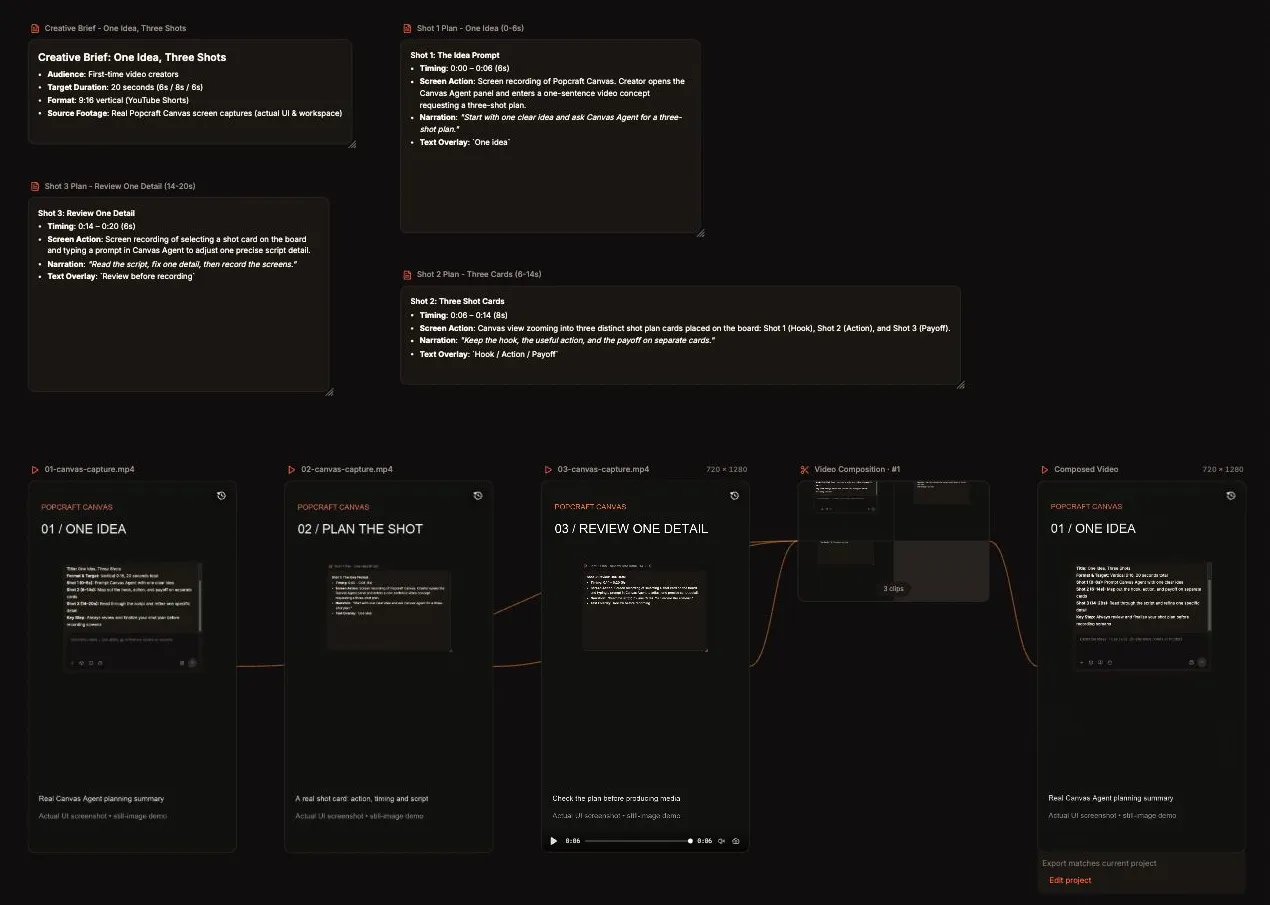
The actual working Canvas board: planning above, imported footage and the connected composition below.
🎯 1. Write a brief with a clear finish
Our viewer should learn how to turn an idea into a three-shot plan. That gives the Short a simple beginning, middle and end: enter the idea, inspect the three cards, and review the plan before recording.
Write down the essentials:
- Audience: first-time video creators.
- Takeaway: use separate cards for the hook, useful action and payoff.
- Planned format: 20 seconds, vertical 9:16.
- Visual source: your actual Popcraft Canvas workspace.
- Optional narration: short English lines that leave time to read the interface.
Twenty seconds is our choice for this example. YouTube's desktop Shorts flow currently accepts square or vertical videos up to three minutes. Check YouTube's Shorts requirements.
🤖 2. Open Canvas Agent and keep review points visible
Open Popcraft Canvas and a board, then use the Canvas Agent panel on the right. Select Manual mode, described in the interface as asking before each generation. In this workflow, the first-send confirmation also offered Confirm each batch. Read the proposed action before confirming it, especially when you move from planning to media generation.
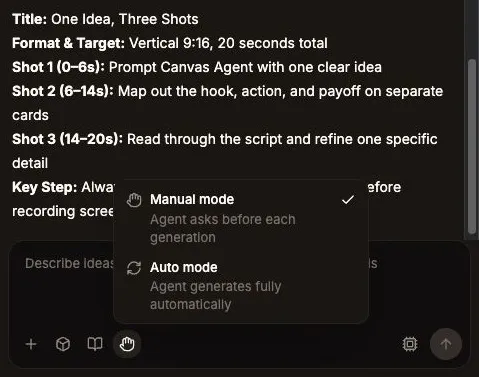
Manual mode keeps a review point before generation. Screenshot captured in the current Canvas interface.
💬 Prompt to try:
Plan a 20-second, vertical 9:16 YouTube Short called “One Idea, Three Shots” for first-time creators. Teach one action: turn an idea into a three-shot plan in Popcraft Canvas. Add one concise creative-brief text node and three clearly named shot-plan text nodes. Use real Canvas screenshots or screen recordings as the planned visuals. For each shot, include its duration, exact screen action, narration and short on-screen text. Use six, eight and six seconds. Plan only; do not generate images, video or audio yet. Show me the script for review.
Check the board as well as the chat reply. You should be able to locate the brief and the three plan cards, read their contents and identify what remains to be produced. The cards define what to make; the media and composition come next.
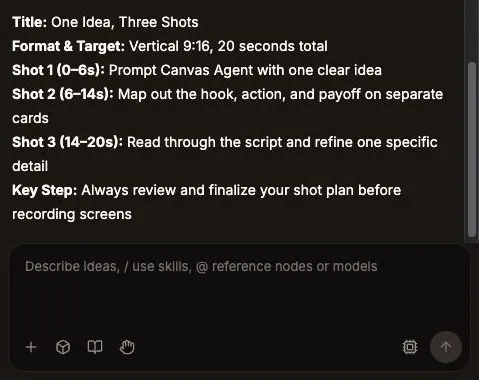
The Agent summary from the real planning session.
🎞️ 3. Check what each shot teaches
The six/eight/six-second plan became the three-clip timeline. Here is how the real captures illustrate it, with optional narration and suggested overlays:
Shot 1. One idea, 0–6 seconds. The screenshot shows the Agent's planning summary. It gives context for the request and resulting plan. Suggested overlay: “One idea.”
Start with one clear idea and ask Canvas Agent for a three-shot plan.
Shot 2. Inspect a card, 6–14 seconds. The screenshot shows the Shot 1 plan card as an example of the structure to inspect. Suggested overlay: “Hook · Action · Payoff.”
Keep the hook, the useful action, and the payoff on separate cards.
Shot 3. Review, 14–20 seconds. The screenshot shows the Shot 3 review card. It keeps the review instruction visible as the closing frame. Suggested overlay: “Review before recording.”
Read the script, fix one detail, then record the screens.
If you add narration, read all three lines aloud and time the actual recording. Shorten a line or adjust its shot if needed. The silent example does not establish a measured voiceover duration.
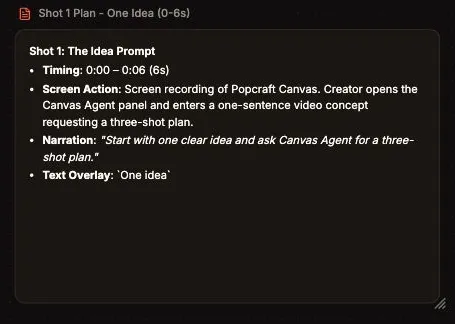
A readable shot card gives you four things to check before producing footage.
✏️ 4. Revise the plan before capturing media
An AI-written plan can include attractive actions that do not match the screen you can actually record. Inspect every instruction: does the named control exist, is the text readable, and does the proposed action teach the promised step?
Ask for a narrow revision:
Keep the creative brief and three-shot structure. Revise shot 3 to show reviewing a text card and fixing one detail. Use only visible Canvas controls and real screen actions. Keep the narration “Read the script, fix one detail, then record the screens.” Do not add another shot or start media generation.
Then inspect the revised card. Confirm that the narration, screen action and overlay agree. Remove unsupported claims such as “instant” when your recording and evidence do not establish them. Preserve the version you intend to record so the script does not change halfway through production.
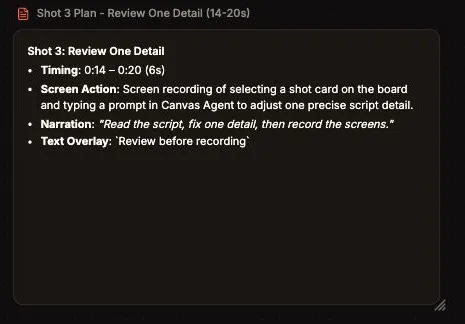
The revised review card on the Canvas board.
📸 5. Prepare real screenshots as video assets
For this example, capture the Agent summary and the two relevant cards. Hide account details and unrelated content, then crop each screenshot around the text the viewer needs. Check legibility at phone size; a full desktop squeezed into a vertical frame makes small labels hard to read.
Prepare the clips in a video tool outside Canvas:
- Set a vertical 720 × 1280 frame and place the first cropped screenshot inside it.
- Hold that still for six seconds and export a silent MP4.
- Repeat for the Shot 1 card at eight seconds and the Shot 3 card at six seconds.
- Reopen each file and verify its duration, framing and readability.
Name them in order. Our files are 01-canvas-capture.mp4, 02-canvas-capture.mp4 and 03-canvas-capture.mp4. Keep the original screenshots too. This preparation turns real still images into video source files; Canvas did not generate these clips.
You can instead record real screen actions with your preferred screen recorder. Leave pauses for trimming and keep the pointer away from important text. Label any edited recording accurately rather than presenting shortened waits as measured generation speed.
🧩 6. Import the clips and open the composition
Use Add node → Upload to import the three MP4 clips onto the Canvas board. Choose Add node → Video Composition BETA to add a composition node. In this example, Canvas Agent connected the three uploaded clips, in order, to that node.
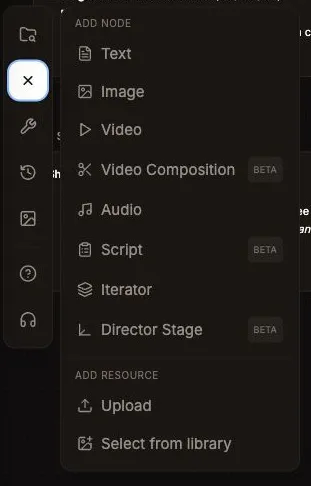
Use Upload for your source clips and Video Composition BETA for the sequence.
Give the Agent an explicit request, identifying the actual clips and composition:
Connect the three existing uploaded clips to the existing Video Composition node in this order: 01-canvas-capture.mp4, 02-canvas-capture.mp4, 03-canvas-capture.mp4. Use their six-, eight- and six-second durations. Use these assets only; do not generate replacement footage or add audio.
Inspect the connections, then choose Open video composition editor on the composition node. The observed editor shows the three clips and a 00:20 timeline. This is the route used for the sequence. The video node's Edit video tooltip describes prompt-based editing, so do not treat that similarly named action as the composition-editor shortcut.
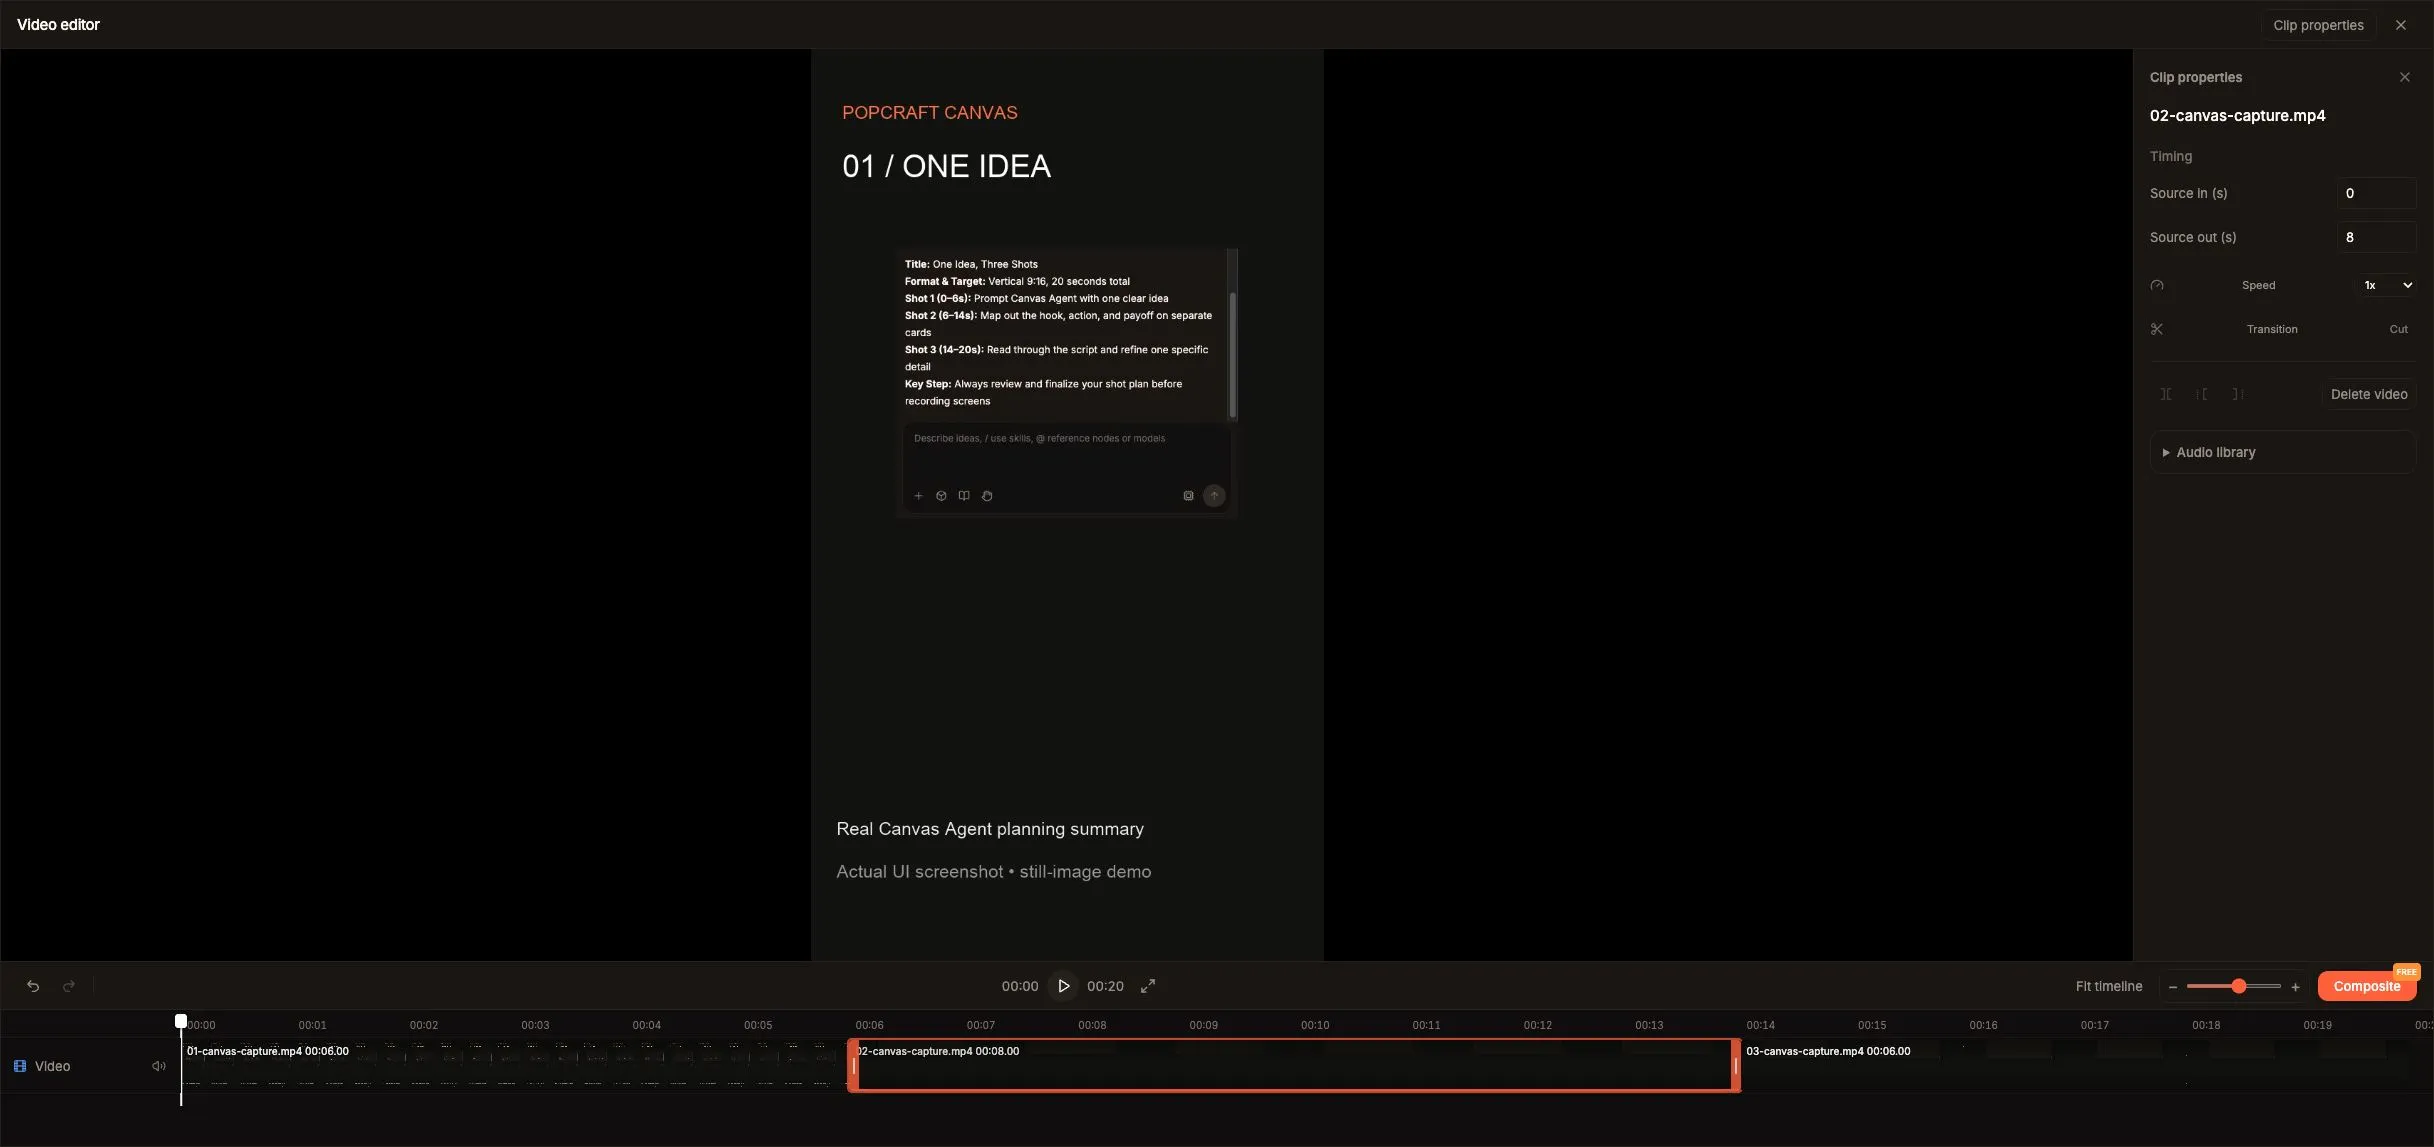
The actual composition editor with 6-, 8- and 6-second clips.
Open the full-size Canvas editor screenshot.
Selecting a timeline clip exposes Source in (s), Source out (s), Speed, Split at playhead and Trim controls. Adjust only what the edit needs, then review the neighboring cuts. A timing change can make a card unreadable or interrupt narration added later.
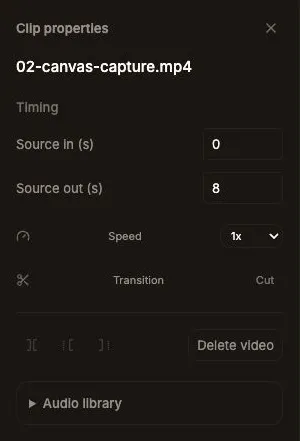
Clip properties for the eight-second middle clip. Control availability depends on selection and playhead position.
🎙️ 7. Decide whether to add narration
The demonstrated composition is silent. To make a narrated version, record the three planned lines or use Popcraft Audio. Listen to the actual take and refine the cut so a first-time viewer can follow the wording.
The suggested overlays can emphasize the structure. Add text with the controls available in your editing tool; use another editor for a treatment those controls do not provide. Keep important words away from the edges and check them at phone size. Captions should follow the actual spoken words.
Music is optional. If included, keep it below the voice. You can also add or correct a subtitle track in YouTube Studio. YouTube's caption guidance.
📤 8. Review and export the actual video
Preview the entire sequence, checking the opening, text size, transitions and last frame. For a narrated version, also check voice timing and the audio mix. In the observed composition editor, Composite is the render action; its button displayed FREE in this session. We used it to render this three-clip composition.
After rendering, close the editor and select the Composed Video output on the board. In this run, the card showed Export matches current project. Use its Download control to save the file; Edit project reopens the source composition.
✅ Export checked: The downloaded MP4 was verified at 20.00 seconds, 720 × 1280, 30 fps, H.264, with no audio track. Those are the measured properties of this example, not a promise about every export. The file contains the three screenshot clips in the intended order.
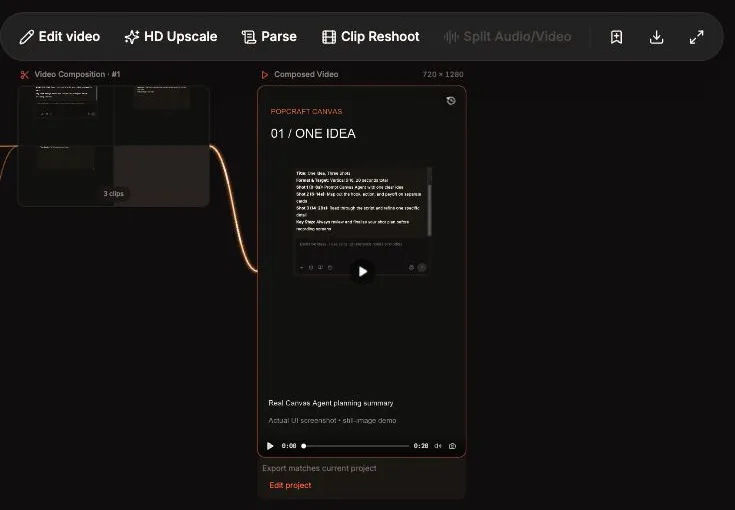
The rendered output on the board. Download the current render or return through Edit project.
Check the downloaded file again after changing a clip or its timing. YouTube recommends MP4 with H.264 video and supported audio such as AAC-LC, preserving the recorded frame rate. These are YouTube recommendations; choose settings supported by your own production workflow. YouTube's encoding guidance.
Reopen the downloaded file outside the editor and check its picture from beginning to end. Confirm that a silent version stays silent, or that an added soundtrack plays correctly. Use a representative real interface frame as the cover.
🚀 9. Upload through YouTube Studio
Sign in to YouTube Studio and choose Create → Upload videos. Select the inspected file, complete its details and start with Private or Unlisted visibility so you can review the processed version. YouTube's upload instructions.
Suggested title:
One Idea, Three Shots: Plan a Short with Canvas Agent
Suggested description:
Turn one idea into a brief and three shot cards in Popcraft Canvas. This silent walkthrough uses three real Canvas screenshots prepared as video clips outside Canvas, then arranged in a Canvas composition.
Complete the audience setting and the AI-use or altered-content disclosure shown in your upload flow. YouTube treats AI script assistance differently from realistic scenes fabricated or meaningfully altered with AI. Answer based on the footage and audio actually included. YouTube's GenAI disclosure guidance.
Review the processed video, captions and any checks. Choose Public or schedule publication when that version is ready.